
When using a telescope for astronomical observations, locating celestial objects can be challenging. Optical finder-scopes serve as essential accessories that assist in pinpointing stars, planets, and deep-sky objects. They offer a wider field of view than the primary telescope, making it easier to locate targets before fine-tuning with the main optical instrument. This article explores the types, benefits, installation, alignment techniques, and considerations for choosing the right optical finder-scope for your telescope.
What is an Optical Finder-Scope?
An optical finder-scope is a smaller telescope mounted parallel to the main optical tube. Its primary purpose is to act as a guiding tool to help users find and center celestial objects in the night sky. Finder-scopes typically have lower magnification and a broader field of view than the main telescope. They often come equipped with crosshairs or illuminated reticles to aid in precise centering.
Types of Finder-Scopes
- Straight-Through Optical Finder-Scopes
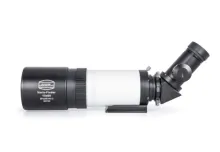
These are basic finder-scopes mounted in a straight line from the eyepiece to the objective lens. They are ideal for users who want a simple alignment process. However, bending down to view through these can sometimes be uncomfortable, especially when the telescope is aimed at high angles. - Right-Angle Finder-Scopes
Right-angle finders are designed to make viewing more comfortable by angling the eyepiece at 90 degrees to the telescope body. This reduces the need to crouch or bend, making them excellent for observing objects at zenith (directly overhead). However, they can be a bit confusing to use at first due to the different orientation of the field of view. - Correct-Image Finder-Scopes
Correct-image finder-scopes provide a view that matches the orientation seen with the naked eye. Unlike traditional finder-scopes that invert or mirror the image, these show objects in their natural left-to-right orientation, making it easier to relate to star charts.
Benefits of Using Optical Finder-Scopes
- Wide Field of View: An optical finder-scope's broad field of view allows users to quickly scan and locate celestial objects, even when they're faint or hard to spot.
- Improved Accuracy: The crosshairs or reticles present in many finder-scopes help astronomers accurately center their target objects in the main telescope.
- Comfortable Observing: Right-angle and illuminated finder-scopes can significantly reduce neck strain during prolonged observation sessions.
- Aid for Astrophotography: Finder-scopes play a crucial role in astrophotography by helping the user to initially locate and frame the object, ensuring accurate alignment.
Installation and Alignment
To function effectively, finder-scopes must be securely mounted and precisely aligned with the main telescope. Here's a step-by-step guide to setting up an optical finder-scope:
- Mount the Finder-Scope Bracket
Attach the finder-scope bracket to the designated area on the main telescope tube. Ensure that it is tightly secured and stable. - Insert the Finder-Scope
Place the optical finder-scope into its mounting bracket and fasten it with screws or clips. The scope should be snug but adjustable. - Align the Finder-Scope During Daytime
Choose a distant terrestrial object (e.g., a church steeple or a distant tree) and center it in the main telescope's field of view. Next, look through the finder-scope and adjust the screws until the same object is centered in the crosshairs. - Final Alignment on a Bright Star
At night, aim the main telescope at a bright star. Use the finder-scope adjustment screws to bring the star to the center of the finder’s crosshairs. Once both scopes show the same star in the center, the alignment is complete.
Considerations When Choosing a Finder-Scope
When selecting an optical finder-scope, consider the following factors:
- Aperture and Magnification
A larger aperture and moderate magnification provide brighter and more detailed images, which are beneficial for deep-sky observing. - Type of Mount
Choose between a dovetail mount, double-ring mount, or a bracket with alignment screws, depending on your telescope's design and compatibility. - Illuminated or Non-Illuminated Reticles
For deep-sky objects or dim stars, an illuminated reticle can make it much easier to find and center your target. - Budget and Quality
Higher-quality optics and sturdy construction will provide a better viewing experience. Consider brands like Orion, Celestron, and Stellarvue for reliable options.
Common Issues and Troubleshooting
- Finder-Scope Slipping Out of Alignment
Check the tightness of the mounting screws and use additional padding or shims if necessary. Misalignment can also occur during transportation, so always recheck before observing. - Difficulty Seeing Through the Finder-Scope
Ensure proper focus by adjusting the eyepiece. For illuminated reticle models, check the brightness setting to avoid glare. - Right-Angle Orientation Confusion
Practice using the right-angle finder-scope to get accustomed to the flipped view. Use the correct-image models if this becomes a persistent issue.
Optical finder-scopes are invaluable tools that significantly enhance the stargazing experience, making object location easier and more accurate. Choosing the right model—whether straight-through, right-angle, or correct-image—depends on individual preferences, observing needs, and the type of telescope you use. With proper alignment and practice, a good finder-scope can transform your telescope into a powerful instrument for exploring the night sky.