
Red dot finders are one of the most popular tools used by amateur astronomers to simplify the task of aligning a telescope to a specific point in the sky. Whether you're a beginner or an experienced stargazer, understanding how a red dot finder works and choosing the right one for your setup can significantly enhance your observing experience. In this guide, we’ll explore the fundamentals of red dot finders, how they work, the different types available, and tips for using them effectively.
What is a Red Dot Finder?
A red dot finder is a type of reflex sight that projects a red LED dot or reticle onto a small piece of glass or plastic, which acts as the aiming point. Unlike traditional finderscopes that magnify an image, a red dot finder does not provide magnification; instead, it allows the observer to see the night sky and the red dot simultaneously. This makes it easier to locate celestial objects quickly and accurately.
The red dot itself is not visible to the naked eye when viewed from outside of the telescope, making it ideal for preserving night vision and preventing distractions.
Key Features of Red Dot Finders:
- Zero Magnification: This feature allows the observer to maintain a wide field of view, making it easier to match the dot to stars and planets visible to the naked eye.
- Adjustable Brightness: Many red dot finders have adjustable brightness settings to cater to various lighting conditions.
- Simple Alignment: Easy-to-use alignment screws help match the red dot with the telescope's main optics.
- Lightweight and Compact: Most red dot finders are small, lightweight, and do not add significant weight to the telescope setup.
How Does a Red Dot Finder Work?
A red dot finder uses a small LED light that projects a dot onto a lens inside the finder. This lens is coated to reflect only the specific wavelength of light emitted by the LED, ensuring that only the red dot is visible when you look through it. Because the lens is angled in front of the observer's view, the dot appears to float over the sky, allowing you to place it on the star or object you want to observe.
When the red dot is aligned with the telescope’s main optics, whatever you center the red dot on should be visible through the eyepiece of the telescope. This makes finding stars, planets, and other celestial objects much easier than trying to use a traditional optical finder.
Types of Red Dot Finders
There are several types of red dot finders available, each with unique features that cater to different observing needs:
- Basic Red Dot Finders:
- These are simple models with a single red dot that can be adjusted for brightness. They’re lightweight, affordable, and ideal for beginners.
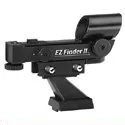
- Example: Orion EZ Finder II – A popular, cost-effective choice with easy-to-use adjustment knobs.
- Multi-Reticle Red Dot Finders:
- These finders offer multiple reticle patterns, such as crosshairs or circles, in addition to the traditional red dot.
- Example: Telrad Reflex Sight – Known for its concentric circle patterns, the Telrad is often preferred by astrophotographers and deep-sky observers.
- Illuminated Reticle Finders:
- Designed for precise aiming, these finders use crosshair reticles that can be illuminated in low-light conditions.
- Example: Rigel Quickfinder – Features adjustable brightness and multiple reticle patterns.
- Holographic and Heads-Up Display (HUD) Finders:
- These are the most advanced red dot finders, using holographic technology to project more complex reticle shapes and patterns.
- Example: Celestron StarPointer Pro – Uses a dual-circle reticle instead of a single dot for better targeting.
Choosing the Right Red Dot Finder
When selecting a red dot finder, consider the following factors:
- Telescope Compatibility: Ensure that the finder will mount securely to your telescope. Some models use proprietary mounting brackets, so check if it’s compatible with standard bases or if an adapter is needed.
- Field of View: A wider lens in the red dot finder can provide a broader field of view, making it easier to locate stars.
- Reticle Type and Brightness Control: Some observers prefer a basic dot, while others like using circles or crosshairs. Look for a finder with adjustable brightness settings to avoid overpowering the night sky.
- Ease of Alignment: Some finders are easier to align than others. Look for models with precise adjustment knobs that don’t require excessive tweaking.
Using a Red Dot Finder Effectively
Using a red dot finder effectively is a straightforward process but requires proper setup:
- Align the Red Dot Finder During Daylight:
- Set up your telescope and point it at a distant terrestrial object, such as a radio tower or a tree. Using the telescope’s main optics, center the object in the field of view.
- Adjust the red dot finder’s screws until the dot is centered on the same object. This alignment will carry over to the night sky.
- Choose a Bright Star for Initial Alignment:
- At night, select a bright star as your initial alignment point. This makes it easier to fine-tune your setup.
- Use Low Brightness for Dimmer Stars:
- When targeting dim stars or deep-sky objects, keep the brightness of the dot as low as possible. A bright dot can obscure faint objects.
- Align the Finder Regularly:
- Check the alignment periodically, especially after moving the telescope. Even slight bumps can knock the finder out of alignment.
Common Issues and Troubleshooting
- Dot Does Not Stay Centered:
- If the dot moves when you shift your head position, it’s a parallax issue. Ensure the red dot finder is securely mounted and check the alignment screws.
- Dot is Blurry or Star-Like:
- This can be due to the brightness being set too high or a dirty lens. Reduce brightness and clean the lens gently.
- Red Dot Won’t Turn On:
- Check the battery first. Most red dot finders use coin cell batteries, which can drain faster in cold weather.
Red dot finders are essential tools for amateur astronomers, providing a quick and intuitive way to aim telescopes at celestial objects. By choosing the right type of finder and aligning it properly, you can make star-hopping and object location easier and more enjoyable. Whether you are observing the Moon, planets, or deep-sky objects, a good red dot finder can make your nights under the stars more productive and less frustrating.